Pages

Showing posts with label Parties. Show all posts

Tuesday, May 3, 2011

Party: of {Butterflies} and {Owls}

I had the greatest time helping out with the decorations for my friend Jessica's baby shower.  The brains behind the event was my friend Susannah who is amazingly creative {I call her Martha}.  She allowed me the privilege of helping, and together I thought we did a pretty good job.  At least we had a fun time doing it!

Jessica is decorating her nursery with owls and butterflies. I just happen to adore, so I was ecstatic when I found out her theme and that we were using it as the theme for the shower, too. There is no shortage of owls in my house, and we used almost every one of them.

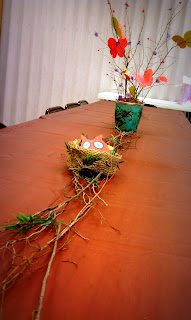
Susannah's gorgeous centerpiece idea: sticks from her back yard with flowers and cut-out paper butterflies hot glued onto the branches.


Susannah made these adorable little nests. So cute! The owls were my creations.


The shower was held in a school classroom at our church and we had to cover up the white board.  Not an easy task.  We ended up with a sort of butterfly net look.  We were satisfied.


Stamped napkins


Tuesday, March 15, 2011

The Tissue Paper {Chandelier}

So back to the party decorations...
I wanted to incorporate some tissue paper flowers, but wasn't sure how.  I am not a fan of using decorations in a conventional way.  If I'm going to hang something from the ceiling, I'm not going to just hang it.  I wanted a sort of chandelier hanging above the island where the cake would be. {Learn more about the cutsie cake here}  My husband didn't want 9 holes put into our ceiling, so check out the contraption he thought up.  We hung them from our recessed lighting.


 I know what you are thinking..."those strings are hideous!!"  My thoughts exactly until they were all up and you didn't even notice them.  The angle of the camera kind of focuses on them, but from ground level, you are just looking at the pretty tissue chandelier. 


So here's the how to...

You'll need:
     *Tissue papar - I used 6 sheets {3 in each color} and cut them in half
     *Twist ties
     *Scissors


Lay out your half pieces of tissue paper {you can use whole pieces for bigger flowers} in alternating colors.


Fold the tissue paper back and forth as if you were making a fan.  Round out the edges with the scissors.


Put a bend in the center of your "fan" and pinch the center together.


Twist your tie around the center. WARNING: If you're hanging these lovelies, attach the string NOW.  I learned the hard way and had to untie the twist ties after the balls were already "puffed". 


Fan out the edges.  Make sure you pull GENTLY! 


Hardest part...but fun.  This is where you start seeing the final picture.  Remember, easy does it. Begin with the outer layers first, separating them as far down as you can. 


Final product.  Lovely!!


Linking back to: Home Body Holly
                           The Shabby Nest


Wednesday, March 9, 2011

Party: Crate Paper {Roses}

You know that type of person who relays a story by starting roughly a decade before the actual event? Do you hate it? Well, then you probably should get ready, because I'm about to do just that.  

When I graduated from high school, I had no idea how to cook. So when I entered college, I took a few cooking classes because I figured my future husband wouldn't want to eat Ramen noodles and PB&J's every night (those were my specialties).  

During my first year cooking class, we spent several weeks cake decorating.  At first, I was extremely excited.  I imagined myself creating a beautiful three-tiered cake with fountains of colorful icing and gobs of gorgeous flowers.  Um....wrong. I spent roughly three weeks trying to keep a steady hand, failing, swiping off the frosting, trying again, failing, and swiping of the frosting again.  Talk about frustrating. 

All that history to say that I don't decorate cakes with frosting.  I posted pictures yesterday of Suze's birthday.  Since we didn't want just a sheet cake from Wal-Mart (no offense, Wal-Mart), we went with a cake from Sherry's Bakery, a bakery here in Dunn known for it's scrumptious pastry creations. But you can't just have a plain, white-frosted cake.  You've just found that I detest decorating cakes with frosting, so what else could I do?  Hmmm. 

I thought about ribbon at first, but I didn't have any. So out came the crate paper and the little crate-paper roses were born.  NO FROSTING!!


What you'll need: 
  • crate paper (any color)
  • card stock
  • quilting pins (the type with the ball at the end)
  • tape


Begin by tightly balling up the crate paper. This will be the center of your flower.  While holding the center with one hand, twirl the crate paper LOOSLY around the center with your other hand.

Secure the end with tape.  Don't worry, it won't show : )

Cute, right?!

 
I didn't want the crate paper to touch the cake (I was afraid it might bleed into the frosting), so I cut out circles of card stock to put behind the roses.  I chose green and it sort of looked like leaves.  To attach it to the cake, I used quilting pins because they are longer than regular pins.  The kind I had just happened to have yellow balls at the end.  Perfect!


Tuesday, March 8, 2011

Party: of {Colors}

This past Friday, I had the delightful privilege of hosting a party for my good friend, Suze.  It had been quite some time since I had planned a party like this one, so my brain was all abuzz with ideas and inspiration for the special event.  I had a blast making the decoration and, of course, had an amazing time at the party with the birthday girl and her family.

I'm not a huge fan of over-kill decorations.  Simple and sweet is what I prefer.


Because I HATE decorating cakes with actual icing (not patient enough), I used crate paper rosebuds to decorate this cake (which, by the way, I did NOT bake : ) Tutorial to follow at a later post.


Whimsy, color, and bounce all rolled into one.  I will also be posting a tutorial on these adorables.

I've been seeing flag garland all over the place.  Thought I'd make my own.  

I made these out of the only thing I had an abundance of - tissue paper.  It's inexpensive but is also tedious.  I do love how flowy they are, though, and would definitely make more.  Again, I'll "tut" you on these as well.


Had so much fun! When's the next party? : )


Related Posts Plugin for WordPress, Blogger...